Tutorial: Montage and HEALPix
Contents
Purpose of this Tutorial
Montage has been extended to support transforming HEALPix data into any WCS-supported projection to aid in visualizing the data and comparing it to data from other missions.
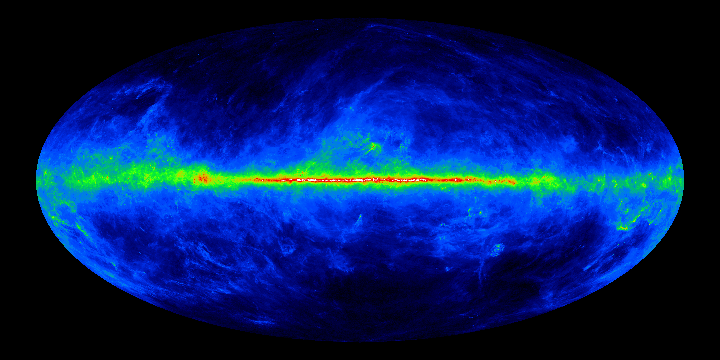
HEALPix data are nearly always stored in FITS binary tables rather than pixel image, and require special processing to treat them as spherical projections. This tutorial takes a user step-by-step through this process, by creating a map of the Planck All-Sky data at 857 Ghz in Aitoff projection from the native HEALPix map.
This tutorial can benefit experts in HEALPix as well as beginners. Experts may wish to go to the processing steps directly, but we recommend beginners read the introductory material first.
Processing Flow
The diagram at right calls out the processing steps, as follows: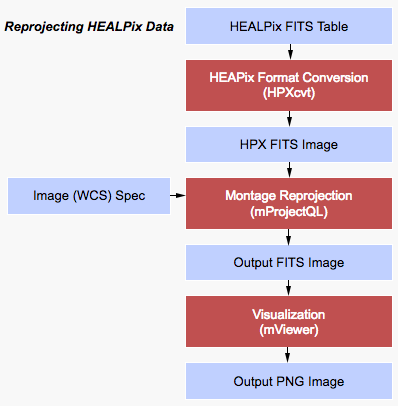
- Convert the HEALPix table file into FITS image form.
- Define the image projection, pixel scale, coordinate system and image rotation for your final image
- Reproject the data.
- If you want a PNG to look at, create it with the visualizer tool.
Most of this can be done in a rote manner but the user needs to decide on the parameters of the reprojection and the visualization settings. Since HEALPix data are frequently all-sky maps, a good starting point for reprojection is an all-sky projection like Aitoff with a pixel scale based on the order of the pixel size of the HEALPix data.
HEALPix Overview |
Top |
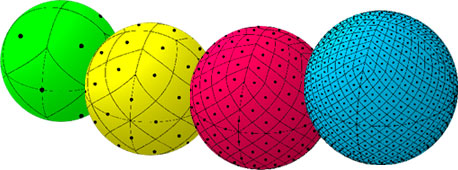
HEALPix (Hierarchical Equal-Area isoLatitude Pixelization) is a tesselation of the sphere developed to support astronomical missions that map the entire sky and need to do analysis in a full-sphere context. All the pixels at a given resolution have the same area and the pixel centers are arranged in latitude bands. Levels of increasing resolution are achieved by splitting pixels into four equal portions recursively. These attributes greatly aid in a number of integration and harmonic analysis tasks.
For more information on HEALPix and its uses, see the JPL HEALPix page.
HEALPix FITS Pixel Tables |
Top |
While HEALPix represents a mapping of the entire sky, the data are invariably stored as pixel value tuples for each HEALPix cell in FITS table files. Here is a text table version of the first few records in the HEALPix table for the 857 GHz data from the Planck mission.
Technically, we could use any of the columns as the basis for our reprojected image and in certain engineering contexts there would be value in that. For science purposes however the first column (polarization intensity measure) makes the most sense. In the conversion below, this is the default column used.
      \DATE = '2015-06-18'
      \PIXTYPE = 'HEALPIX '
      \COORDSYS = 'GALACTIC'
      \NSIDE = 2048
      \FIRSTPIX = 0
      \LASTPIX = 50331647

      |I_STOKES      |HITS       |II_COV        |
      |double        |int        |double        |
      |MJy/sr        |           |(MJy/sr)^2    |
      |              |           |              |
              223.421         669    0.000636951
              238.518         684    0.000626747
              237.305         748    0.000572965
              253.736         730    0.000580927
              271.816         768    0.000566814
              358.968         750    0.000579375
              301.504         682    0.000624272
              429.381         702    0.000605934
              253.116         671    0.000638462
              267.552         660    0.000648440

        ...
HEALPix FITS Images |
Top |
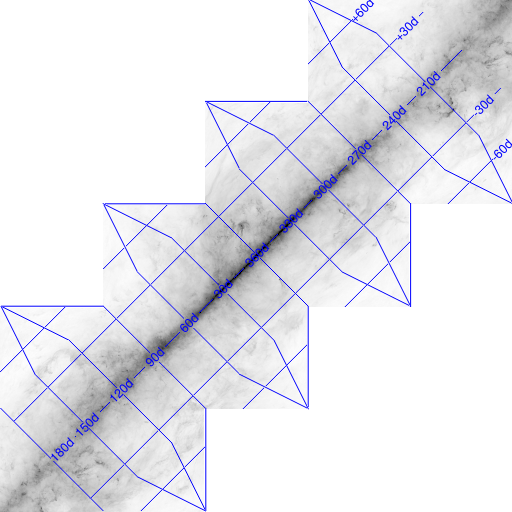
HEALPix as a projection.
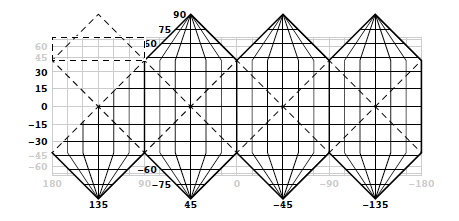
Calabretta and Roukema have shown that the HEALPix mapping is actually a hybrid class that combines a cylindrical equal area projection at low latitudes with Collignon projection nearer the poles. The figure on the left is reproduced from that paper.
Moreover, the HEALPix pixels become perfect diamonds (rotated squares) in this projection, so by rotating the space by 45 degrees, HEALPIX can be mapped into a standard pixel array (albeit with half the space empty).
Converting from tables to images.
Calabretta's WCSlib package includes a utility for converting from HEALPix FITS tables to HPX FITS images. This involves no resampling as the image pixels correspond one-to-one with the HEALPix cells in the table.
We have included a copy of that utility (HPXcvt) with Montage as-is for our users' convenience; none of the rest of WCSlib is needed to build it.
HEALPix support in the WCS library.
All of the above was essentially getting HEALPix data into a form (FITS image file with a recognizable projection) that Montage can understand.
The WCS library Montage has been using is from WCSTools (from SAO), and incorporates Calabretta's WCSlib. The WCSTools libary does not include the HPX projection so we have added these. Because of this, users who replace the copy of the WCS library we distribute with Version 5.0+ will lose HPX support.
Reprojecting HEALPIX Images using Montage |
Top |
Since we have added HPX to the WCS library, it immediately becomes available in the Montage reprojection modules (mProject/mProjectQL). There are no constraints when converting from HPX to any other projection. Converting from other projections to HPX is also feasible and technically has no constraints. However, there are limitations in HEALPix regarding pixel scale (more accurately the number of pixels in the "all-sky" representation) that limit which HPX files are true "HEALPix" and can be converted back to HEALPix table form (and no utility currently exists for this to our knowledge).
An End-to-end Example |
Top |
In this example, we are starting with the Planck 857GHz data used above. This can be downloaded from IRSA (here). If you have your own HEALPix FITS table file, you can use that instead.
Step 1 Convert the data to a FITS image file:
HPXcvt HFI_SkyMap_857_2048_R2.02_full.fits Planck857.fits
Step 2 Create output image specification (header template file):
Then, as with any Montage reprojection, you need to define the header for the output FITS file. For our first example, we will generate an Aitoff all-sky map (Galactic coordinates). This requires a FITS header like the following (feel free to adjust the size / pixel-scale / offsets as you like): SIMPLE = T
BITPIX = -64
NAXIS = 2
NAXIS1 = 720
NAXIS2 = 360
CTYPE1 = 'GLON-AIT'
CTYPE2 = 'GLAT-AIT'
CRVAL1 = 0.
CRVAL2 = 0.
CRPIX1 = 360.5
CRPIX2 = 180.5
CDELT1 = -0.5
CDELT2 = 0.5
CROTA2 = 0.0
END
We put this in the text file AIT.hdr.
Step 3 Reproject the HEALPix image:
For this example we will assume we are making an image for presentation (rather than photometric science) purposes, so we will use the faster mProjectQL module. mProject will work as well but be slower.
mProjectQL Planck857.fits Planck857_AIT.fits AIT.hdr
Step 4 Make a PNG version of the image:
If what you want is the reprojected FITS image, you're done but for completeness, we'll include a call to mViewer to generate a PNG to look at:mViewer -ct 4 -gray Planck857_AIT.fits -2s max gaussian-log -out Planck857.png
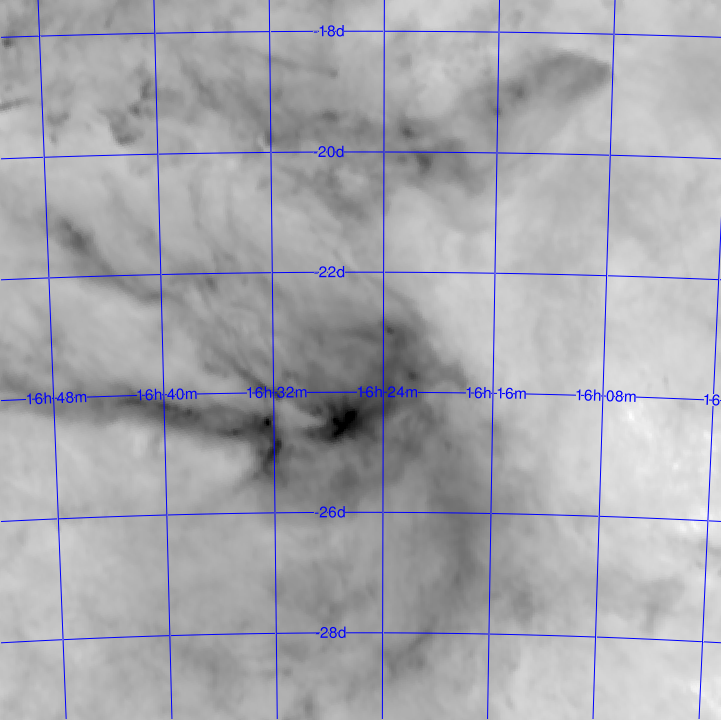
Using the same input data, we can also make a Gnomonic projection image with 1 arcminute pixels in Equatorial coordinates centered on ρ Ophiuchus (using mHdr to create the header file):
         mHdr -p 60. "rho Oph" 12. rhoOph.hdr

         mProjectQL Planck857.fits rhoOph.fits rhoOph.hdr

         mViewer -ct 1 \
                 -color blue \
                 -grid eq j2000 \
                 -gray rhoOph.fits -2s max gaussian-log \
                 -out rhoOph.png
Copies of all the files used or generated during this tutorial are available here.